An Introduction To Astrophotography Using Fujifilm X-Series Cameras by Jon Kerrin
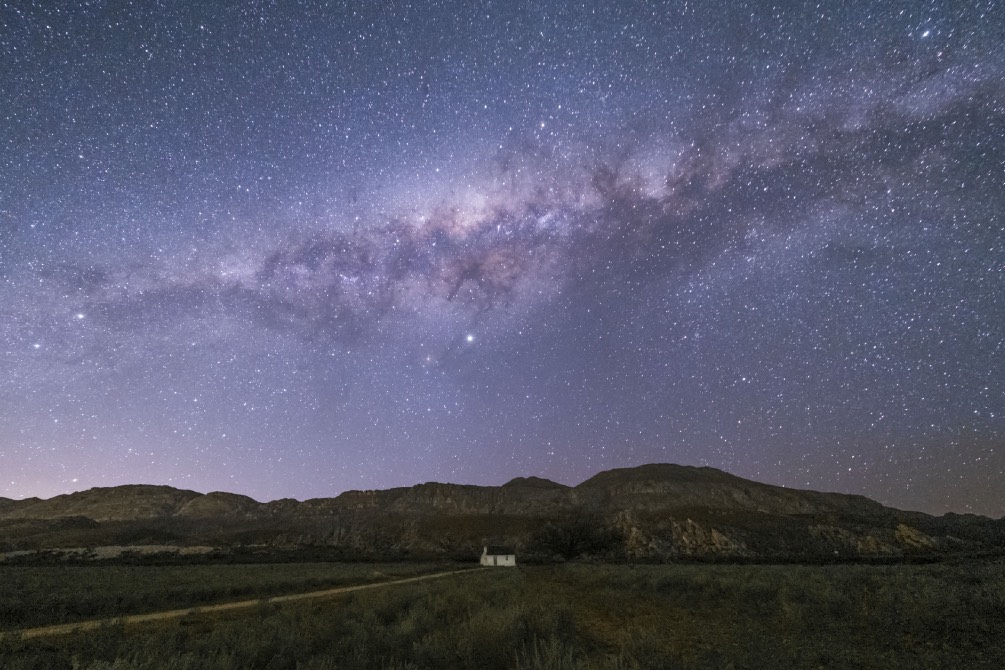
X-T3 + 8-16mm f/2.8, ISO4000, 20sec, f/2.8

X-T1 + 10 –24mm f/4.0, ISO3200, 30sec, f/4.0
Long before I picked up a camera one of my favourite things to do was stare up at the stars and watch the world go by. There is something mesmerising and hypnotising in staring at the night sky and wondering what lies in the great beyond.
Naturally, when I started my journey in photography I was very eager to get out and find a place where I could photograph the stars. But for any of you who live in the city, you will know that trying to photograph the stars in these concrete jungles is a near-impossible task. My first experience shooting Astro was on a trip my father and I did to Namibia. The country has wonderful clear skies with very little light pollution. This made it ideal for practising. I tried and failed many times on that trip and eventually, on my last night there, I managed to take a photograph I liked.
I have been shooting astrophotography for many years now, and now lead workshops and photographic tours dedicated to shooting the stars. From my experiences shooting astrophotography I am going to share with you some of the tips and tricks that I have learnt along the way, not only in photographing the stars but in using Fujifilm cameras to capture these magnificent skies.

X-T3 + 8-16mm f/2.8, ISO4000, 20sec, f/2.8
Equipment You Will Need
Camera:
I have shot astrophotography with excellent results with the X-T1, so don’t worry too much about what Fuji camera you use, so long as it can change lenses. I currently use the X-T3 which is an astrophotography machine and handles lowlight conditions superbly.
Lenses:
Starting out in astrophotography you will want a lens with a wide focal length to help you get as much of the sky in as possible.
-
The first lens I used for astrophotography was the Fuji 10-24mm f/4.0, the same lens that I still use for my landscape images. This is a fantastic lens for shooting the stars, and even though it is limited to f/4.0 it still takes incredible photographs and is extremely sharp.
-
The Fujifilm kit lens, the 18-55mm f/2.8-4 is another great option that allows you to open your aperture nice and wide. This is a great lens to experiment with if you don’t want to invest in an Astro-dedicated lens straight away. But you will soon want something with a wider focal length to see more of that big beautiful sky.
-
I have recently had the opportunity to use the new Fuji 8-16mm f/2.8. This is a fantastic lens for astrophotography. It is super-wide and pin-sharp with a constant aperture of f/2.8, allowing you to let in a lot of light.
-
Some great third-party lenses I recommend are the Laowa 9mm f/2.8 and the Samyang 12mm f/2.0. Both of these lenses offer sharp quality glass and low light performance at a reasonable price.

X-T3 + 8-16mm f/2.8, ISO4000, 20sec, f/2.8
Tripod:
Yes, a camera is what takes the photograph… but the tripod you use is what will ultimately determine if it’s a good photograph or not. Make sure you invest in a sturdy tripod that can stand steady on uneven ground and windy conditions.
Shutter Release Cable:
Astrophotography requires you to shoot exposures of a few seconds to minutes at a time. This is why it is important to invest in a shutter release cable that will eliminate any shake to your camera, keeping your images nice and sharp. If you do not have this cable you can also make use of the 2-second timer delay.
Head Torch:
Photographing in the dark can be a clumsy process. Make sure you have a head torch to help you easily change settings on the camera and to see what’s around you. (Pro Tip: Do not turn on your torch while you are exposing an image and make sure to communicate with others shooting around you before you put your light on to avoid a harsh bright light in your or their shots).
Planning

X-T1 + 9mm f/2.8, ISO6400, 25sec, f/2.8
One thing crucial to any successful astrophotography shoot is planning. We know that every single night the stars will be above our heads somewhere. But what we can’t guarantee is that we will be able to see or photograph those stars. This can be due to a number of factors including weather, location, moon phase or season, and factoring in these four things can help you to better plan a successful astrophotography shoot.
Weather:
It should go without saying that a sky covered in the cloud is not a sky you want to photograph for pictures of the stars. If you are planning an Astro shoot check the weather forecast to makes sure you have good clear skies. (ProTip: The best conditions for shooting nice clean skies clear of haze and dust are often shortly after some rainfall ).
Location:
The best location for an astrophotography shoot is the darkest one you can find. This normally means getting as far away as you can from towns or cities that cause a lot of air pollution and dull the brightness of the sky. These inhabited areas generally leave harsh bright light on the horizon. (Ideal locations for astrophotography include deserts, mountainous regions or farmlands. These areas are generally away from the light-polluted cities.)
Moon Phase:

X-T3 + 9mm f/2.8, ISO3200, 30sec, f/2.8
While the moon itself can be beautiful to photograph, a bright and full moon is no ally in photographing the stars. This is for the very same reason why it is better to not shoot near cities. A full moon can overpower a scene with brightness, dulling the stars and making your night sky less impressive. For the brightest starry skies try planning your shoot within a 5-day period either before or after the new moon. A simple google search can help you plan around the moon phases.
Season:
By season I do not mean the calendar seasons that include summer, autumn, winter and spring. I am talking about Astro season, and this refers to the time of year that the milky way body is best visible in the sky. During an annual cycle, the earth rotation causes the angle that we see the milky way to change. At some points of the year, it sits perpendicular to the earth’s horizon, while at other times it lies flat in line with the horizon, sometimes not even peaking over the horizon. If you want photographs of the Milky Way to make sure you choose to shoot in the appropriate months of the year when the body is visible. In the Southern Hemisphere, this period is roughly between February and October.

PhotoPills Augmented Reality Mode
Planning Aids:

windy.com Meteorological Map
To plan for weather I use an app called windy.com. This weather forecasting app gives detailed data including cloud cover and wind speed, and is great for planning both Astro and landscape photography shoots and is free on both Android and iOS. To know where the Milky Way will be positioned at any given time of the year I use the app PhotoPills, available on Android and iOS for around R150.00. If you plan to do fair amount astrophotography I highly recommend this app. I waited far too long to purchase it. But it is extremely powerful and can help you immensely in knowing what to expect and how to compose at any given scene.
Focusing
Making sure that the stars you are shooting are in focus is one of the biggest hurdles people face when starting astrophotography. But this obstacle is made much easier with the help of the Fuji X System. To begin with, make sure you have turned the camera to manual focus. Point your camera to the brightest star you can find in the sky and slowly start to turn your focus ring. I suggest enabling both Focus Zooming and Focus Peaking in your settings. Once you start to turn the focus ring you will notice the back LCD or EVF digitally zoom-in closer to the star you have pointed your camera toward. As you turn the focus ring the star should change from a big fuzzy blob to a neat and fine dot, and with Focus Peaking enabled this dot should change to the colour you have selected in your Focus Peaking settings (mine is enabled to red). This is when you know the stars are in focus. Half-press down the shutter to move away from the digital zoom. Now, without adjusting the actual zoom on your lens you can move your camera to recompose the image.

X-T3 + 8-16mm f/2.8, ISO6400, 30sec, f/2.8
Aperture
Aperture controls the amount of light our camera allows onto the sensor, and since astrophotography requires us to shoot in dark conditions we want to allow as much light into the camera as possible. For this purpose, the lower your f-stop number on the lens you have, the better it will generally be for astrophotography (assuming you are not shooting with a telephoto lens). Ideally, a lens that can open to f/2.8 or lower will give you the best results. But f/4.0 such as what the Fuji 10-24mm offers will give you very good results as well. Whatever your maximum aperture is on your lens make sure to keep it at that when shooting the Milky Way. (Remember, the lower the number, the better!)

X-T3 + 8-16mm f/2.8, ISO4000, 20sec, f/2.8
Shutter Speed
Finding the right exposure time for shooting Milky Way shots can often be a process of trial and error. Each camera model and lens combination gives different results. So finding your sweet spot is a matter of knowing your equipment. Exposing for too short a time will result in dark images while exposing for too long can cause blurry or streaky stars caused by the rotation of the earth. A good way to get an idea of how long you should expose for is to loosely follow the Rule of 500.
To do this take 500 and divide it by the focal length you have chosen to shoot at (in Full-Frame terms). This number should be a rough guide as to the longest time you can expose your shot for before the stars begin to trail. This number is usually somewhere between 20-30 seconds.
ISO
Depending on the aperture that you’ve used and the maximum exposure time you are limited to you will now need to increase your ISO to boost the sensitivity of the sensor to light. A good place to start is at ISO1600, and if you need to you can increase it to as high as ISO6400. Do not go higher than this as the noise levels in the image become too pronounced. The lower your ISO is the cleaner the image will be.
Shoot RAW
Astrophotography photos almost always need a bit of post-processing. This is why it is important to shoot in RAW. This will allow you to extract a lot more detail out of the image than a JPEG file.
Composition
Composing images can be a tricky process when shooting in the dark. I often like to use silhouettes as foreground elements such as mountain peaks, trees, or interesting rock formations.
As it is often difficult to extract a lot of detail in the bottom half of an Astro image, I have found that having water in the foreground of your image can often work as a nice source to reflect light off of, creating a more balanced photograph between highlights and shadows.

X-T3 + 8-16mm f/2.8, ISO3200, 30sec, f/4.0, 66-images stacked
Conclusion
Astrophotography is a lot of fun once you get to know the basics, after which you can start experimenting with many other techniques such as star-trails, panoramics, light-painting and exposure blending. I hope these tips help you take better shots of the night sky with your Fuji Cameras. Be safe, may the skies be clear, and happy shooting!
More From Jon Kerrin
Website: https://www.jonkerrin.com
Facebook: https://www.facebook.com/jonkerrinphotography/
Instagram: https://www.instagram.com/wherethelight_is/
Jon offers tuition on landscape photography, astrophotography and post-processing, and runs photographic tours across South Africa as well.
15 Comments
Leave a Response


Hi there. Thanks for sharing your experiances. Did you ever tried 16-55 f.28 lens for astrophotography?
Hi Jan. No I have never used that lens for astro, though I imagine it would perform very well being a fixed f/2.8. The only issue is it might not be wide enough unless you are doing pano’s.
Hi there. Thanks for sharing your experiances. Did you ever tried 16-55 f.28 lens for astrophotography?
Hi Jan. No I have never used that lens for astro, though I imagine it would perform very well being a fixed f/2.8. The only issue is it might not be wide enough unless you are doing pano’s.
Hi there. Thanks for sharing your experiances. Did you ever tried 16-55 f.28 lens for astrophotography?
Hi Jan. No I have never used that lens for astro, though I imagine it would perform very well being a fixed f/2.8. The only issue is it might not be wide enough unless you are doing pano’s.
Hi,
Thanks a lot for this blog.
Do you think X-e3 or x-t30 will be fine ?
Hi Pascal.
Yes, the X-E3 and X-T30 will be perfect for astrophotography. They both have excellent sensors, as this is what counts. More important than your camera though is the lens that you use. Try use a wide lens with a low aperture. F/4 will get you decent shots, but what you really want is something that can got to F/2.8 and lower.
I’m about to try my first try at Astro this weekend with the X-S10 and 16-80 f4 lens. I know it’s not ideal but that’s all I have right now. Any recommendations for the settings to use ? I was thinking around f4, iso 3200 at 15 seconds?
I’m about to try my first try at Astro this weekend with the X-S10 and 16-80 f4 lens. I know it’s not ideal but that’s all I have right now. Any recommendations for the settings to use ? I was thinking around f4, iso 3200 at 15 seconds?
I’m about to try my first try at Astro this weekend with the X-S10 and 16-80 f4 lens. I know it’s not ideal but that’s all I have right now. Any recommendations for the settings to use ? I was thinking around f4, iso 3200 at 15 seconds?