Building a Picture By Anton Bosman, Fujifilm X-Photographer
We often look at images and just admire them, this is of course, fantastic and admiration is what drives us to push our own creative boundaries.
I regularly sit in front of my browser with YouTube running in the background and a second browser open, searching and looking for fantastically made landscape and cityscape images created by the many talented photographers around the globe.
Studying compositions, wondering about the light, the placement of a static subject within the frame, the time of day the image was created, etc.
There are a few points I want to touch on which I believe to be key in creating above average images for the genres I love so much – landscape and architecture.
My key points to landscape and architectural photography include:
-
Understanding dynamic range.
-
Composition – the basic rules, why and how they apply.
-
Light – we know of it but do we know how to seek and utilise it?
-
Developing a personal style and refining the editing to achieve that goal.
-
Understanding our gear and the limitations we are working within.
Dynamic range
Dynamic range is a term often used, but the basic understanding thereof is sometimes lacking. In simple terms, dynamic range is the ratio between the smallest and the largest signal that a certain quantity can assume. This is in relation to sound and light. In layman’s terms, it can be said that it’s the ratio between the highest treble and the lowest bass, and the ratio between the brightest light and the darkest shadow.
The human eye has a dynamic range of 20 stops in the shadows and around 10 stops in bright light (according to literature). The eye also has the ability to quickly adapt to these massive differences and by doing so it balances out the light within a scene.
Our camera sensor is not that fortunate. Besides some strong claims, the real issue we are dealing with is that our camera sensor does not have the ability to capture this wide variation and balance it all out in one single image.
But this is where the beauty of Fujifilm enters. With the X-Trans sensor we have an incredible range to work with, provided we know our gear intimately.
Getting back to the genres I shoot. Most of us know what bright and overpowering highlights can do to a scene – how they strip texture from clouds, overexpose the blue in the sky and leave ‘hotspots’ in undesirable places.
Here is where I say a big ‘HALLELUJAH’ to Fujifilm. I often underexpose the scene by up to 3 stops, knowing full well that the X-Trans sensor is more than capable of recovering the shadows without adding too much noise, and by doing this keeping the ISO as low as possible.
Essentially, this is using the power of the X-Trans sensor to create a scene in post edit as close to balanced, as the human eye would see it
Composition
We regularly hear references to the ‘rules’ of photography. The first response normally is to want to rebel and go against the grain, because “creativity has no boundaries”. To me these rules are absolutely critical.
They teach us what the masters of art have discovered over the years by poring over their images. The rule of thirds, centered composition and symmetry, foreground interest, leading lines, patterns and textures, negative space and, my favourite, the golden ratio. These are just a few examples of compositional rules that we need to study, learn and understand.
They are not hard rules to live one’s life by, but they are great guidelines.
Light
Light is what allows our sensor to capture what it sees. Light, or lack thereof, can also be our worst enemy.
Avoid light that is ‘flat’, since without shadows and well-lit areas we lose dimension in the scene and we end up with a very ‘flat’ image that shows no depth. Midday is normally the time of day that yields the flattest light.
The term ‘golden hour’ is often heard, and this refers to, essentially, sunset or sunrise. I love sunsets as the light lingers for longer and the sky yields colours that can surprise us.
At these hours the sun is also at a much lower angle and this is what gives us great contrast, creating good depth and dimension.
Developing a personal style
Developing a personal style becomes evident with consistency. Compositional preferences also become an influence in developing a recognisable individual style.
In post editing we should also push for consistency and a personal style. Take inspiration from others, but ultimately just be you.
Understanding your gear
We need to know our camera body intimately. For example, understanding the menus and layout of the buttons, knowing the limitations of the sensor, and grasping the full capability of our equipment.

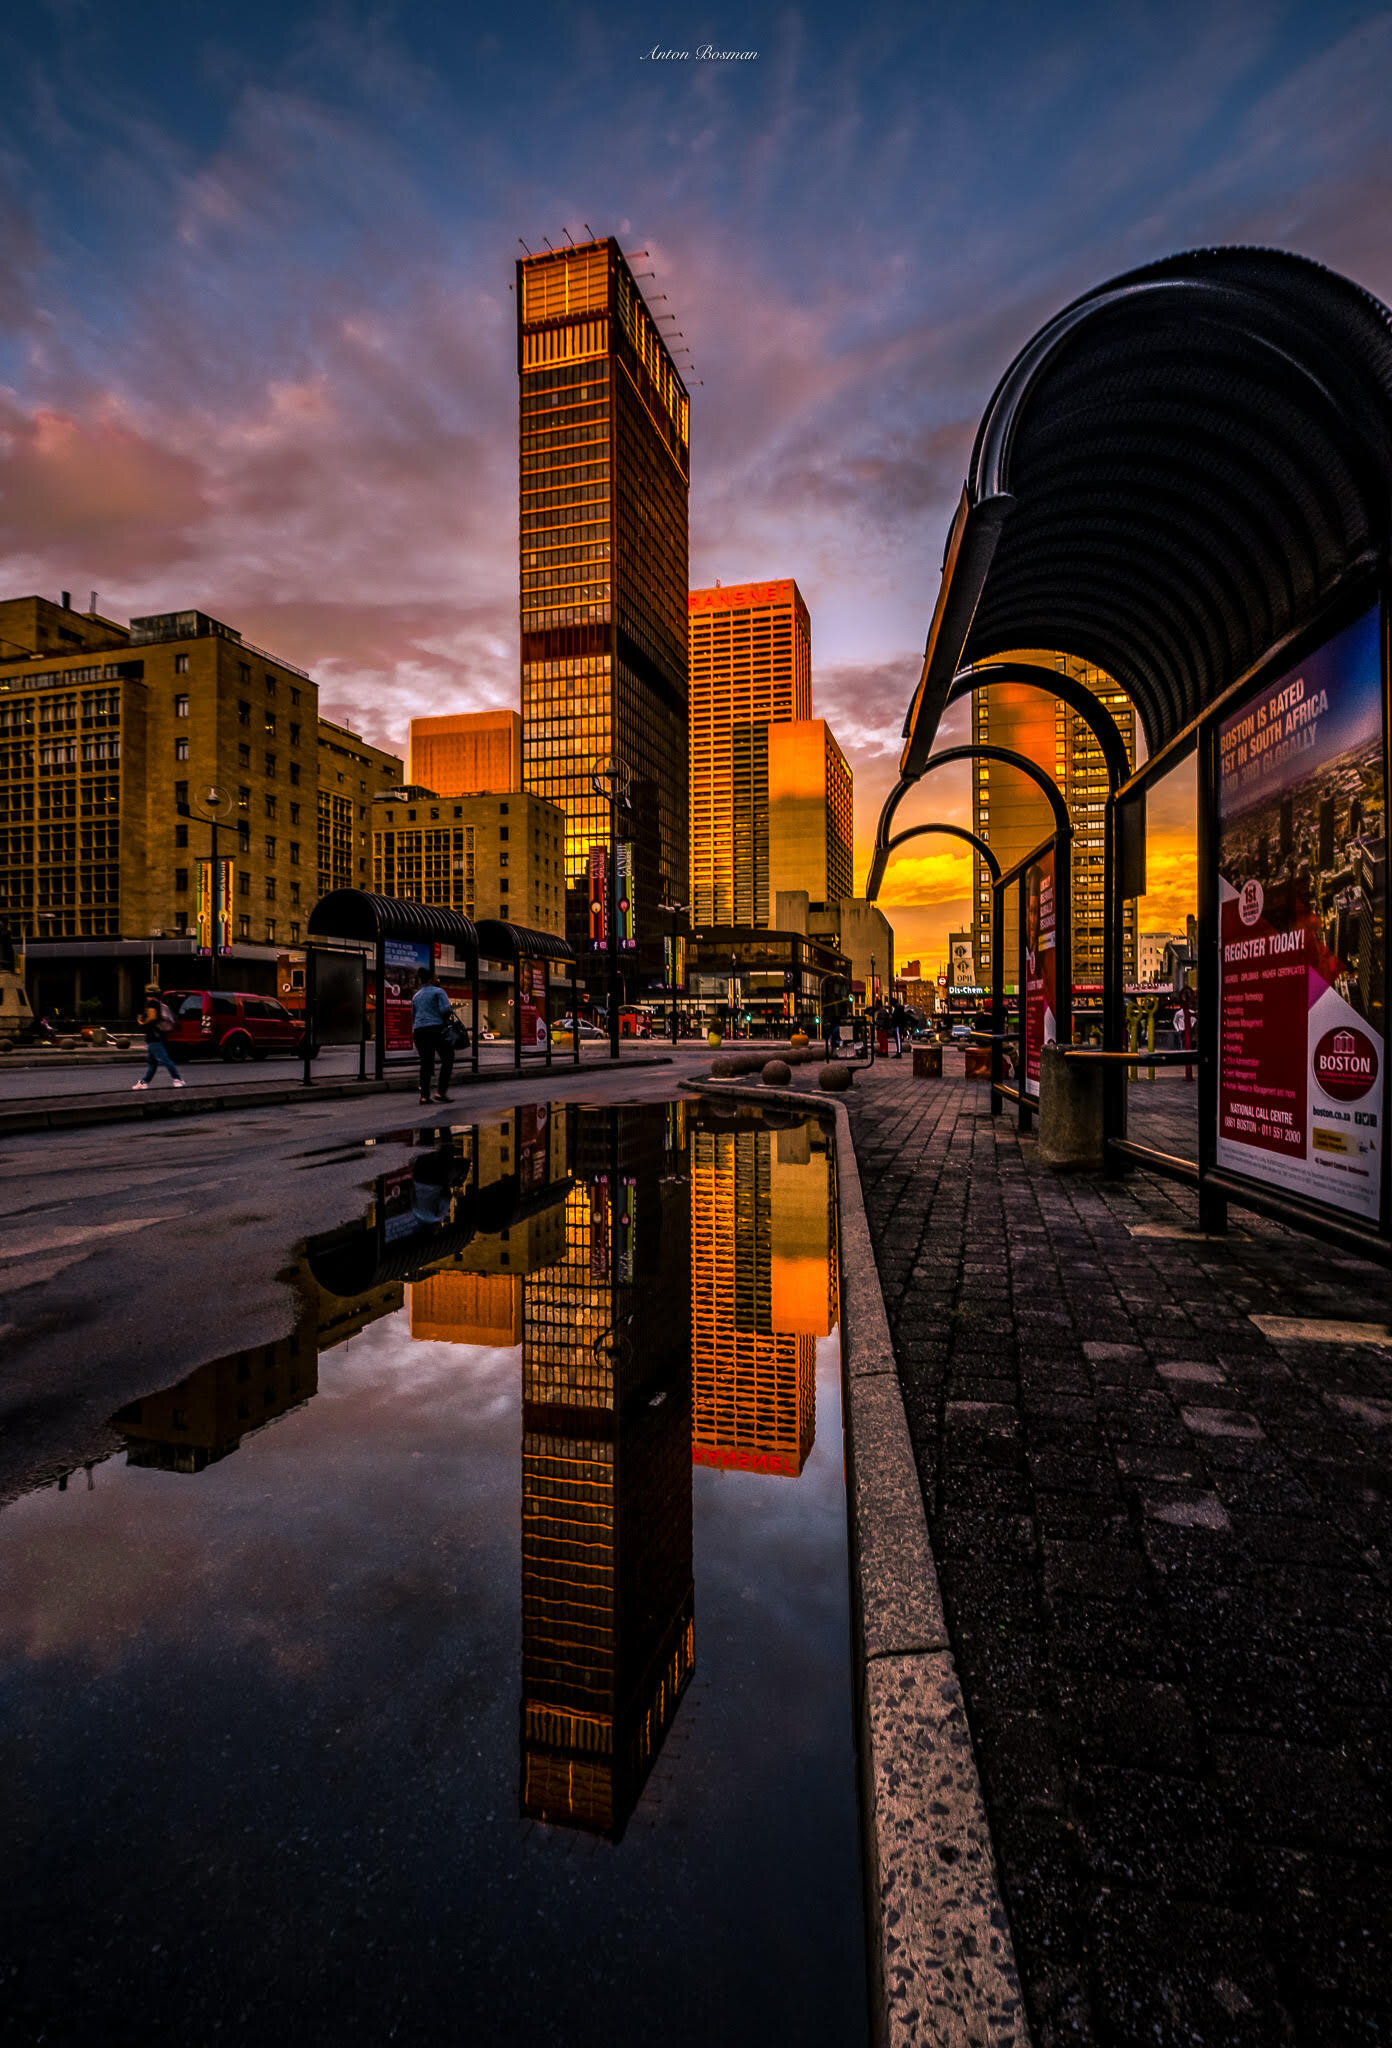
Sunset Reflections
Fujifilm X-T3
Fujinon XF10-24mmF4
ISO 160, Aperture F16, SS-90 seconds
Haida 10-stop ND filter
Tripod
I have photographed this scene many times. After several years and many trips, I was eventually rewarded with the perfect light one evening. The clouds had a lovely texture, the orange glow of the sun (behind me) reflected on to the buildings, and the colour in the sky had enough contrast and depth for a three-dimensional composition.
I wanted the full reflection of the buildings in the scene, and this made me choose portrait orientation as opposed to the more conventional landscape.
After a few minutes of walking around, squatting, sitting and studying the scene, I found the anchor points needed for a strong composition. The beautifully lit buildings were used for a centered composition, and the curb and edge of the puddle to create leading lines towards the main focal point.
The clouds looked great and had good colour, but they were sparsely spaced.
I decided to opt for a longer exposure (90 seconds) since there was enough of a breeze in the air to create movement within the clouds. By using a longer exposure, the clouds also covered more of the sky allowing more of the sunset glow to cover the entire frame.
This, of course, also allowed for good exposure on the buildings and foreground, making for a more balanced exposure and bringing the viewer closer to what the eye sees.
Pushing the Fujifilm X-T3 to its fullest
Attached to the front of the lens was a 4-stop ND filter. This takes light away from the sensor, allowing for a longer exposure which forces cloud movement.
The ISO was kept at the lowest base ISO, which on the X-T3 (shooting in RAW) is 160. I normally keep the aperture as narrow as possible, and the reason for this is twofold.
The narrower the aperture (anything from f 11 and larger) forces a longer exposure time, it also creates a wider depth of field, meaning that most of the scene will be in sharp focus.
An exposure reading is taken using the exposure meter guide within the camera. Once the exposure meter is centered, a decision is made to over or underexpose.
I decided to underexpose by one stop, to not blow out the sky and the texture in the clouds, knowing that the X-Trans sensor is more than capable of allowing one to pull back the shadows in post processing.
Once captured, it’s a case of loading the image into Lightroom to start post-processing according to my own personal style. Here I work extensively in toning down highlights and lifting shadows. Once our camera has captured the magical light within a scene, it’s up to us to bring out the best of those magical elements with our post-processing.
Final tip from this image
Shooting tall structures from a low angle always presents wide-angle distortion, causing leaning buildings and slanted edges.
Fortunately, the Fujinon XF10-24mmF4 is one of the best lenses I have ever used to combat this. Besides the fact that the lens is sharp and capable of fantastic contrast, its ability to work around wide-angle distortion is absolutely mind blowing. Fujifilm have done an exceptional job in working around that common wide-angle distortion and wide-angle perspective that plagues wide angle lenses. The lens also defies the usual issue of diffraction at very narrow apertures, plus colour rendering and sharpness is nothing short of mind-blowing. It’s one of the best lenses I have ever used.
One can work around wide-angle distortion by shooting with more space. In the original RAW image, space was created at the top, bottom and sides of the frame. This makes life very easy in post, applying vertical correction without losing any of the buildings within the frame.

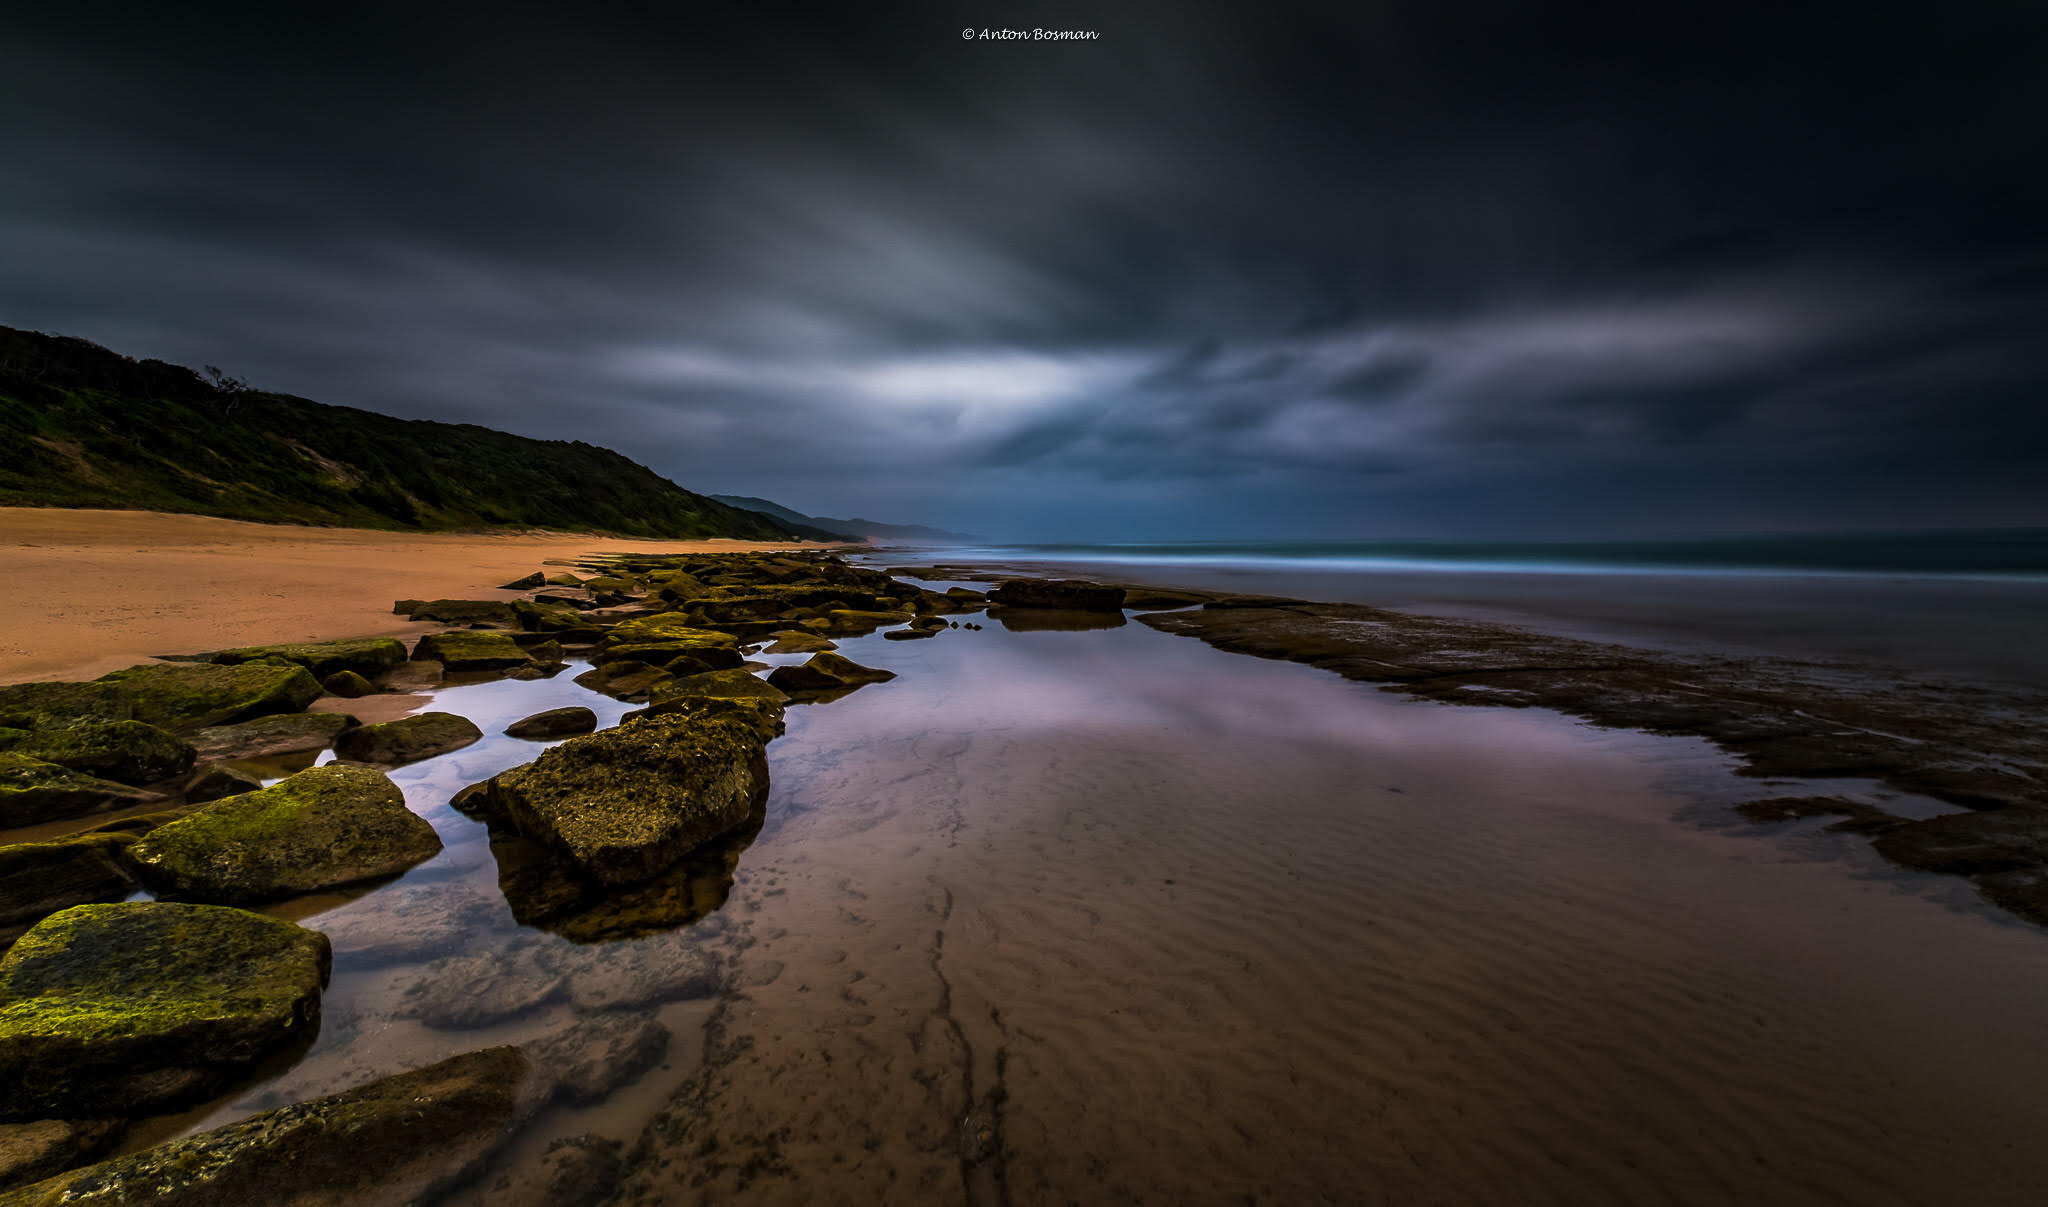
Cape Vidal Mornings
Fujifilm X-T2
Fujinon XF10-24mmF4
IS0 160, Aperture F13, SS 180 seconds
Tripod
This image had the best, and worst light. With the thick cloud cover one has a natural scrim, allowing for a nice and even ‘soft’ light. But the thick clouds are not allowing any of the golden glow of the sun to appear.
However, the scene was just too amazing to ignore and the decision was made to create something moody and atmospheric.
For this there needed to be movement within the clouds but I also hoped for a break in the cloud during the three-minute exposure to let some natural light through. This allowed for the luminescence in the water and some cloud movement, which created separation and texture.
The exposure, unlike the previous image, was pushed to one stop overexposed.
I wanted detail in the foreground since the moss showed hues of green, which at one stop under didn’t really pop. I got great exposure from the sand but needed more from the rocks and moss.
With me I had a strong 1800 lumens light I use for cycling, set to the lowest 800 lumens. With even strokes the rocks and water were light painted.
The long exposure smoothes out the water, making it transparent and bringing out the texture of the sand below. This texture made for an interesting foreground, which worked really well within the composition.
The composition was carefully constructed by using the moss-covered rocks as a leading line. The rocks on the right were perfect in creating a V-shaped conjunction with the moss-covered rocks as well as the dune running towards the shoreline.
This leads the eyes to the dramatic sky, which contributes greatly to the overall mood of the full scene. Again, the Fujinon XF10-24mmF4 was fantastic in doing its job, and my X-T2 at the time didn’t flinch at whatever was thrown at it.
The great thing with making this image was the ease of use that one gets from the Fujifilm gear. The 10-24mm seems to defy the laws of physics and works fantastic from f11 upwards without the usual diffraction.
One word of warning, when you start playing with narrow apertures, you must be certain the camera sensor is spotlessly clean.
One other fantastic attribute to the mirrorless system is that there is no ‘light leak’ coming from the viewfinder. On my old DSLR I had to use duct tape to cover the eyepiece.
Another exceptional feature on the Fujifilm bodies is the fact that one hardly ever has the need to use bulb mode (I do use bulb mode, don’t get me wrong), since the software built into the body allows for long exposures of up to 15 minutes without the need of locking a trigger mechanism.
Lastly, post edit was done from a RAW image and edited to my own style and preference.
Thank you so much for taking the time to read, I can only sincerely hope that this has been informative and helpful. There is so much more that I would love to discuss in depth, but that would be a very long read.
Thank you to Fujifilm for their fantastic products, I can only give praise to the brand that changed the way I make images. I also want to point out that I was an avid fan of the products long before becoming an X-Photographer.
Be blessed and I hope to see you all soon for a photo walk.


Loved this article! It vocalises a lot of the thoughts I go through when choosing and composing my pictures. Please do more of these 🙏🏽
Loved this article! It vocalises a lot of the thoughts I go through when choosing and composing my pictures. Please do more of these 🙏🏽
Loved this article! It vocalises a lot of the thoughts I go through when choosing and composing my pictures. Please do more of these 🙏🏽